Showing posts with label vegetarian. Show all posts

Friday, March 15, 2013

Toasted Caesar Tortellini with Green Beans and Carrots

Happy Friday, all! This week was a real whirlwind between work and preparing for Norah's birthday. That means it's time for those easy peasy meals that take almost zero effort.

Today, I bring you something I whipped together using some past recipes and stuff I had in the fridge.


Toasted Caesar Tortellini with Green Beans and Carrots

Ingredients
1 pack of tortellini (I used six cheese, but any will do)
1 bag of ready to use green beans
2 carrots, peeled and diced
1 onion, sliced
olive oil
bread crumbs
parmigiano reggiano cheese
cooking spray
1/2 cup Caesar dressing (I used light, but creamy would probably be delicious)

Directions
Cook the tortellini to one minute under package directions and drain.

While the water is boiling and the tortellini cooking, add a tablespoon of olive oil to a wok. Once hot, add beans, carrots and onion. Salt and pepper to taste. Saute for about 5 minutes, until beans are crisp, but not soft.

When tortellini are finished, line a baking sheet with parchment paper and toss the vegetables and pasta onto it. Spray a light coating of cooking spray onto the mixture. Take a handful of breadcrumbs and sprinkle on top. Do the same with the cheese. Turn your broiler to high and pop the sheet into the oven. Let cook for about five minutes, or until everything starts to crisp up.

Remove from broiler and return to the wok. Add dressing and stir. Enjoy!

The great thing about this recipe is that it is totally mix and match. Don't like green beans? Try squash or broccoli or spinach. Don't like caesar dressing? Try Italian, or you could even make your own! Use a light dressing for something a little healthier. Really love cheese? Use heaps of it! You can even increase the heat with some red pepper flakes. Totally easy and totally customizable! I hope you love it as much as we did!

Monday, March 4, 2013

Tofu Egg Rolls

It's Monday again, and that means I completed another goal towards my 52 week challenge over the weekend. This week it was tofu and I really struggled with whether I was even going to do it since I loathe tofu. I've had it on several occasions out at restaurants and have never liked it. It's spongy, the consistency is weird, and it doesn't really taste like anything.

In the spirit of the challenge, I decided to do it anyway. Hence, something sort of safe, tofu egg rolls.

Last week while visiting some of my favorite blogs, I came across this recipe for chicken egg rolls. I figured tofu could be easily substituted, so that's what I did - but I also made half of them with chicken in case the tofu ones were totally gross. My husband had one of each and he said he liked the tofu ones better - go figure!


Tofu Egg Rolls
adapted from Elly Says Opa!

Ingredients
2 Tbsp. vegetable oil, divided
1 package of extra firm tofu
4 scallions, sliced, white and green parts divided
2 Tbsp. low-sodium soy sauce, divided
4 cups coleslaw mix
3 cloves garlic, minced
3/4″ knob of ginger, peeled and grated
2 cups fresh bean sprouts
1 package egg roll wrappers (the package I picked up contained 15 wrappers and was perfect for this recipe)
1 Tbsp. cornstarch, mixed with 3 tbsp cold water
cooking spray

Directions
Before starting, your tofu will need to be drained. Do this by setting on a plate with a paper towel underneath and on top of the tofu block. Place a heavy pan on top of the paper towel and press down. I let my sit like that for about a half hour before I used it and it seemed to work out okay.

Heat 1 Tbsp. oil in wok or large pan over high heat for 2 minutes. Add tofu to the wok; cook about 2-3 minutes, breaking up as  you cook, before adding 1 Tbsp. of the soy sauce and the scallion whites. Continue to cook until chicken is browned and nearly cooked through, about 2-3 more minutes. Remove chicken to a plate and set aside to cool.

To the same pan, add the remaining 1 Tbsp. of vegetable oil. Stir in the coleslaw mix, garlic, ginger, and remaining Tbsp. of soy sauce. Use tongs to “toss” the vegetables. Cook, over high heat, for about 2 minutes or, until cabbage begins to wilt. Toss in the bean sprouts and scallion greens, and cook for about 1 minute more. Remove from the heat.

Combine the tofu and vegetables, mixing well. Place a colander in your sink, or over a large bowl. Add the egg roll mixture to the colander. Using several layers of paper towels, press down firmly on the egg roll filling, pressing out as much moisture as possible. Repeat process several times. Let filling cool before rolling into wrappers. (Make sure you don't skip this step - otherwise your egg rolls will end up soggy.)

Here's what the mixture looks like after it's drained.
Preheat the oven to 425.  Wrap the rolls according to the package directions, dipping your finger in the cornstarch/water mixture and then using it to seal the roll. Place the rolls on a baking sheet, spray with cooking oil. Bake until golden brown, about 15 minutes.

These egg rolls turned out fantastic. Since it's only me and my husband, I froze the ones we didn't eat so that we'll have something quick to eat in the future if dinner plans go awry. 

Wednesday, February 6, 2013

Black Bean Burgers, Redux

I've made black bean burgers before, and while they've tasted good, they've never been great. Imagine my delight when I saw that this week's challenge for 52 Weeks of Cooking was legumes.

First, I had to check if a black bean qualified as a legume. A quick hop over to wikipedia informed me that, yes, the beans qualified. Since I've made them before, I started with the old recipe and then doctored it up.

Changes
  1. This time I used one can of corn and one can of black beans.
  2. I added half of a red pepper to the pulsed mixture.
  3. No jalapeno because the grocery story was sold out.
  4. Instead of fresh herbs I had to settle for dried because, again, the grocery store was fresh out.
  5. I used a whole wheat sandwich thin instead of a traditional hamburger bun.
  6. Served with salsa this time instead of traditional burger toppings. My husband quite liked his with hot sauce.
And just a few notes on the cooking:
  1. When I cooked the first batch on medium, one side burned before it could cook through. I would suggest cooking at a lower temp for longer.
  2. Don't try to flip them before they've cooked pretty thoroughly or they will fall apart.


Wayne's World EXTREME CLOSE-UP!

Saturday, April 24, 2010

Eggplant Dip for I Heart Cooking Clubs

Awhile back, I participated in a blog roundup called Tyler Florence Fridays. Well, that roundup sadly came to an end a few months ago. Lucky for me, the people who ran that blog have started up something new called I Heart Cooking Clubs. All the recipes submitted are by a certain chef, just how Tyler Florence Fridays worked, only the chef on I Heart Cooking Clubs changes every few months.

In April, they are featuring the recipes of Mark Bittman. When I first read who the chef was, I though, who the heck is that?. Then when I was searching for recipes, I realized I actually followed his NY Times blog Bitten. Duh, Melissa. An interesting thing about Mark Bittman is that he's never had any formal training, he's never worked at a restaurant. So I guess that means there is hope for all of us cooking enthusiasts yet. Read more about Mark and his philosophy on eating simple here.

If you know anything about Mark Bittman, you'll know he's all about simple and easy. He frequently posts "101" lists on his blog, which go through 101 ways to make something quick. Some of these lists include, 101 salads, 101 make-aheads, etc. I got the recipe below from "101 20-minute dishes for Inspired PIcnics"

This is a departure from my normal recipe post because the recipe is so simple. It doesn't even require an ingredient list.

Eggplant Hummus Dip
from Mark Bittman's 101 20-minute dishes for inspired picnics
, #22

Cook whole unpeeled eggplant in a dry, hot skillet, turning occasionally, until collapsed and soft. (Or grill, or roast, or hold with a fork over an open flame.) While it’s cooling, whisk together tahini, lemon juice, salt, pepper, garlic and parsley in a bowl. Chop the eggplant flesh (leave the peel behind) and roughly mash in the bowl. Add red pepper flakes if you like. Serve with pita


Chef's Notes:
Yup, that's the whole recipe. You thought I was kidding when I said he was a simple cook, didn't you? Since there aren't any measurements, I'll list the amounts I used:

1 large eggplant
1/4 c. hummus (my grocery store was out of plain old tahini)
1 tablespoon of lemon juice - but I ended up squirting in a little bit more after I tasted it
three shakes of salt and pepper
1 clove garlic (if I was just using tahini, I probably would have used 2, but hummus already has garlic in it.)
I'm not sure of the amount of parsley, but after it was chopped, it was about a palmful
1/4 teaspoon red pepper flakes

This is for the potluck roundup on I Heart Cooking Clubs, so I guess it's appropriate that I'm taking it to a BBQ tonight. I'm excited to see what everyone thinks!

Wednesday, April 14, 2010

Pasta Tossed with Broccoli and Diced Tomatoes

Today is the first time I've cooked during the week after work in a loooooong time. It's been tax season for the last few months, and now it is finally over! YAY!

So naturally, being a little out of practice, I didn't take anything out to make. I didn't even think about what could be prepared before my commute home. This meant it was time for a pantry meal. My usual go to ingredients for a 'make it quick' meal are pasta and tomato sauce. I can whip up a decent sauce in a few minutes as long as I have an onion and green pepper in the fridge. Unfortunately, there was no onion.....or pepper. Needless to say, I had to figure out something else.

Staring in my pantry, it finally came to me.

Pasta Tossed with Broccoli and Diced Tomatoes
Kitchen Canister original


Ingredients

1 can of petite diced tomatoes, drained
1 teaspoon olive oil
1 clove of garlic, diced
1 lb pasta - I used Rienzi brand, Cantanisella Lunga
1 leaf fresh basil, torn into small pieces
1 broccoli crown, cut into bite sized pieces

Directions

Boil pasta according to directions on box. While the pasta water is boiling, heat the oil in a large skillet. Place the broccoli pieces in a steamer basket that will fit over the pasta pot. Once heated, saute the garlic for two minutes. Add the tomatoes and basil to the mixture and turn it up to medium heat, stirring constantly so the tomatoes reduce.

When there is 4 minutes left on the pasta, set the steamer basket over the hot water so the broccoli cooks. Once the pasta is finished, add the broccoli into the tomato mixture, and drain the pasta. Add the pasta to the skillet and stir to combine. Once heated through, serve topped with Parmesan cheese.

Tuesday, April 6, 2010

Chickpea Salad

If you read my post below, you already know I hosted my first Easter dinner this weekend. It was fun but stressful knowing that 7 people were counting on me to serve up a tasty meal. If you're interested in how I kept everything under control, look for my post later today with my timetable in it.

Anyway - on to the salad I served.

While perusing the internet for a unique salad, I came across this recipe at Kalyn's Kitchen. It was supposed to be very warm on Easter, so I thought it was the perfect light side dish to go with the other items.

If you'd like the recipe, please click on the link above. The only thing I did differently was omit the olives because I despise olives.


Chef's Notes:

The dressing to this salad had a very strong vinegar taste to it, making it kind of tangy. If you're not a fan of vinegar, then you probably won't like this dressing. You could always add more oil (I think that might make it a bit oily, though) or maybe cut the vinegar with water so you get the same volume of dressing, just less bite from the vinegar.

I highly recommend marinating for the full two hours suggested in the recipe. This gave the ingredients time to meld together.

Overall, the salad was a hit and it was the perfect amount. There was about half a serving leftover that I enjoyed later that night with some corn added to it. This salad would make a perfect lunchtime meal!

Apparently, I am gaga for Chickpea Salads! Check out the one I made last week.

Saturday, March 20, 2010

Chick Pea Salad

Another lazy Sunday gone by and we had nothing to eat for lunch. This Sunday was particularly menancing thanks to our old buddy daylight savings time. By the time we finished eating our waffles for breakfast, it was almost noon! This "spring ahead" business is really no fun.

Thanks to our late (and filling) breakfast, I decided to whip up something pretty light for lunch so we could get back to a normal eating schedule for dinner.

Chick Pea Salad
Kitchen Canister Original


Ingredients
1 can of chick peas, drained and rinsed
1 green pepper, diced
1/2 of an onion, diced (I used a yellow onion, but I bet it would taste better with a red one)
Juice of one lemon
Juice of 1/2 a lime
2 tablespoons olive oil
salt and pepper to taste

Directions
Combine all ingredients above in a large bowl and mix together. Let ingredients blend for about a half hour, then serve.

Wednesday, February 24, 2010

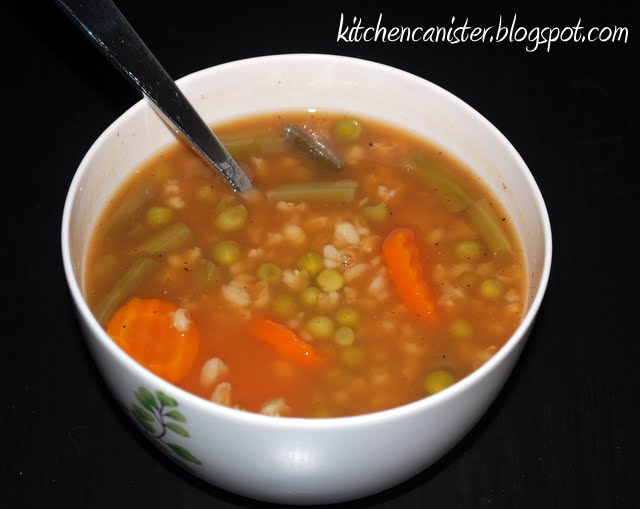
Vegetable Barley Soup

If you're like me, you constantly find yourself rummaging the pantry for something to take to work for lunch. I've had so many turkey sandwiches since January 1, that I think I'm about to turn into one. This week, I vowed that this would not happen, so I took a stroll through my google reader for soups that look both delicious and healthy. Lucky me, I came across this beef barley soup on Jersey Girl Cooks. It was really simple to make, and since we're observing Lent, easy to make meatless for Friday.

Beef Barley Vegetable Soup
courtesy Jersey Girl Cooks


Ingredients
1 TBS olive oil
1 lb top round beef cubes

10 cups beef vegetable broth or stock
8 ounce can tomato sauce
12 oz package of frozen1 1/2 cups chopped carrots
10 12 oz package frozen peas
10 12 oz package frozen green beans
1 1/2 cups barley
1 TBS onion powder
1 TBS garlic powder
salt and pepper to taste


Directions
In a large soup pot, heat olive oil on medium and brown meat. Add broth, tomato sauce, and simmer for 1 hour. Add carrots, peas, green beans, barley, onion powder and garlic powder. Cook for 45 minutes or until barley is tender. Add salt and pepper to taste.

Monday, February 15, 2010

Asparagus Soup

Okay, before you get to the bottom of this post, I need to apologize. I realize that the soup in this picture looks absolutely horrifying. What it lacks in looks, it certainly makes up for in taste, so give it a try!

Asparagus Soup
courtesy Wegmans Menu Magazine


Ingredients
1 small white onion, 1/2-inch dice (1 cup)
1 Tbsp Olive Oil
1 carton (32 oz) Vegetable Stock
1 lb asparagus, 1-inch dice
Salt and pepper
1/2 tsp A. Vogel Herbamare Herb Seasoning Salt (Nature's Marketplace) - I looked this up online and it's really just a mixture of other seasonings that I already had, so I made it myself. Click here for the recipe. I used everything but the kelp and yeast and it tasted pretty good in the soup.

Directions
Add onion and olive oil to stockpot on MEDIUM-LOW. Cook on LOW, stirring often, about 10 min, until onions are soft and translucent, but not browned.

Add stock and asparagus; season to taste with salt and pepper.

Bring to boil on HIGH. Reduce heat and simmer 5 min, until asparagus is knife-tender.

Remove pot from heat. Carefully puree soup with handheld blender until smooth. Season to taste with herb seasoning salt; ladle into warm bowls. Garnish with Creme Fraiche or Parmigiano-Reggiano.

Servings:About 5


Chef's Notes
This soup was really light at only 60 calories a serving. It goes great with a sandwich to round out the meal.

Saturday, January 9, 2010

Broccoli Soup

I think my new favorite food network chefs might be the Neelys. It seems like every time I turn on the TV, Down Home With the Neelys is on. I love the way the two of them work so well together in the kitchen. Granted, I'm sure majority of their moves are choreographed, but it's still nice to see them moving about seamlessly through their recipes.

I grabbed this Broccoli Soup recipe off of their food network page, and while I love broccoli, there was two things I was weary of:

1.) I've never had a pureed broccoli soup before.
2.) I'm not really a fan of creamy soups to begin with.

The figured I could tweak it a little to get through some of my fears. The amount of cream they called for was perfect, but my soup ended up more green than the picture on food network's website and I even ended up using less broccoli than the recipe called for. While we were chopping it up, my husband noticed that one of the crowns we purchased was a little mushy. I didn't want to chance it screwing up a brand new recipe, so we threw it out.

Broccoli Soup
courtesy of Down Home with the Neelys


Ingredients
4 tablespoons butter, room temperature
1 1/2 pounds fresh broccoli
1 large onion, chopped
1 carrot, chopped
Salt and freshly ground black pepper
2 teaspoons red pepper flakes (for extra zing!)
3 tablespoons all-purpose flour
4 cups low-sodium chicken broth (sub out vegetable broth if you're a vegetarian)
1/2 cup cream
Homemade Croutons, visit link above for recipe (I didn't make my own croutons, instead I used ::gasp!!:: store-bought.)


Directions
Melt 4 tablespoons butter in heavy medium pot over medium-high heat. Add broccoli, onion, carrot, salt and pepper and saute until onion is translucent, about 6 minutes. Add the flour and cook for 1 minute, until the flour reaches a blonde color. Add stock and bring to boil.


Simmer uncovered until broccoli is tender, about 15 minutes. Pour in cream. With an immersion blender, puree the soup. Add salt and pepper, to taste, and then replace the lid back on the pot. Serve hot with Homemade Croutons.

Servings: 4 generous bowls


Chef's Notes:
Like I said above, I had to toss one of my florets, but the soup still turned out pretty hearty. I always get nervous that a soup without any meat in it won't be that filling. I served it with a small side salad and some croutons on top and it kept me full all night. I still haven't gotten around to picking up an immersion blender for myself, so I pureed the veggies in my blender by transferring them with a ladle and large measuring cup. ***NOTE: be very careful when blending hot liquids in your blender - the steam can burn!***

Another great thing about this recipe is that it would probably taste just as good if you used vegetable broth, so you can easily adapt it for the vegetarian in your family (as long as they eat dairy products, of course!).

Sunday, November 29, 2009

Penne with Vodka Sauce

Last week my husband took over the kitchen again. He decided to make a simple penne with vodka sauce recipe from Giada over at food network. He made it even simpler by using some store bought marinara sauce as a base. It was a perfect dinner for a Sunday night. We spent most of the afternoon painting furniture, studying, and picking up some new home accents for the house, so we were were running around all day.

Penne with Vodka Sauce
courtesy Giada de Laurentiis


Ingredients
1 quart Simple Tomato Sauce, recipe follows, or store-bought marinara sauce, blended until smooth
1 cup vodka
1/2 cup heavy light cream, at room temperature
1/2 cup grated Parmesan
1 pound penne

Directions
Simmer the tomato sauce and vodka in a heavy large skillet over low heat until the mixture reduces by 1/4, stirring often, about 20 minutes. Stir the cream into the tomato and vodka sauce. Simmer over low heat until the sauce is heated through. Stir in the Parmesan cheese until melted and well blended.

Meanwhile, cook the pasta in a large pot of boiling salted water until al dente, tender but still firm to the bite, stirring occasionally, about 8 minutes. Drain the pasta and transfer it to the pan with the sauce, and toss to coat.


Chef's Notes
I'm not sure if the vodka taste was too strong because of the vodka we used (Ketel One) or because the recipe called for too much. The first night we ate this, my mouth tingled a little bit from the vodka. The next night it must have cooked down a little more when we reheated the sauce because the taste was not as strong. I would recommend cooking the sauce down a little longer, maybe 30 minutes.

We also used light instead of heavy cream to make the meal a little more health conscious. The result was a sauce that was not quite as pink as a vodka sauce you would get in a restaurant. It was just as delicious, though, so I'm not complaining.

If you want to make the sauce from scratch instead of using a jarred sauce, you can find the recipe on the food network site (see link above). Since we didn't use the recipe, I didn't post it.

Friday, October 23, 2009

Butternut Squash and Corn Soup

That crisp fall weather has finally hit us here in NJ and you know what that means: it's time for all those lovely comforting fall foods like squash, apples, roast turkey and of course, soups! Nothing warms a person through and through like a good bowl of soup. Today I was in the mood for just that, so I turned to my trusty friend Tyler Florence for a good soup featuring a favorite fall vegetable, butternut squash.

I just discovered how tasty butternut squash is last year, thanks to this blog. I was looking for a new "fall-ish" recipe and stumbled on a great and simple recipe for pan fried butternut squash. It was heavenly. Butternut squash - where have you been all my life??!!

A few weeks ago, we rekindled our relationship while out at dinner. A local restaurant was serving their version of butternut squash soup and I tried it. It was really good. So good that it's kind of been on my mind ever since. So today is the day I tried out a squash soup on my own - with the help of my favorite food network chef of course!

Roasted Butternut Squash Soup
adapted from Tyler Florence of Food Network


Ingredients
2 (2 pound) butternut squash, halved lengthwise, seeded
Vegetable oil
1/4 pound amaretti cookies
I couldn't find these in my supermarket so I nixed them. I served it with those crostini breads that you buy for bruschetta
1/2 cup olive oil
1/4 bunch fresh sage
1 onion, sliced thin
1 11oz can of white shoe-peg corn
1 clove garlic
splash of heavy cream

4 cups chicken stock, either homemade or store-bought -use vegetable stock to make this vegetarian
Pinch of grated nutmeg - I couldn't find nutmeg at the store either so I used cinnamon
Salt and freshly ground black pepper

Directions
Preheat oven to 375 degrees F. Grease a 13 by 9 by 2-inch glass baking dish with vegetable oil. Place squash cut side up in prepared dish. Pierce each squash half several times with toothpick or skewer. Bake until squash is tender, about 45 minutes.

While the squash is cooking, use a handheld mixer with the chopping attachment to pulse the cookies until roughly chopped. Set aside.

In a large pot, bring the olive oil up to almost smoking. Quickly cook the sage leaves until crisp. Remove and reserve the sage, and saute the sliced onion and garlic. When the squash is done cooking, using a large spoon, scrape squash into the pot; discard peel. Add 3 1/2 cups chicken stock and nutmeg and puree until smooth, add additional stock to reach desired consistency. The video for the recipe shows Tyler adding a splash of cream to his soup at the end, so I did the same, even though the printed recipe doesn't call for it. After pureeing the squash and onions, I added the corn. Stir soup over medium heat until heated through. Season to taste with salt and pepper. Ladle soup into bowls. Top with crushed amaretti; garnish with sage leaves.


Recipe Notes
As noted above, I added corn to this recipe to give it a little extra "something". I also added garlic when I sauteed the onions. Some of the reviews on food network's website said the soup was lacking a little, but I thought it tasted great! It probably would have tasted even better if I wasn't in such a rush to finish it up and remembered to add the cinnamon at the end!

The only thing I wished I had for this recipe was an emulsion blender. After combining the squash, onions, garlic and broth, I had to scoop it out into my regular blender to puree. That was a real pain, since the blender could not hold the entire contents of the stock pot. I ended up blending two batches and then combining them to reheat. Well, Christmas is coming soon, right? Maybe Santa will put an emulsion blender under the tree!!

Saturday, September 12, 2009

Black Bean Burgers

Keeping on our healthy kick, I made black bean burgers the other night. I'll be honest, a burger without meat scares me a little. I wasn't sure if I could really pull this off and have it be tasty. The recipe I found on food network's website got great reviews, so I thought I would give it a try anyway.

It turned out pretty good. The burgers were a little dry, but I think that's because I wasn't getting the right consistency and got a little trigger happy when I was adding more bread crumbs. I'm not sure you could make these on the grill, because it took a little bit of time in the pan for them to reallt firm up. My first one split when I tried to flip it too early.

Black Bean Burgers
from Sandra Lee of Food Network


Ingredients
1/2 medium yellow onion, roughly chopped
1 tablespoon chopped garlic
2 (15-ounce) cans black beans, rinsed and drained, divided
2 tablespoons freshly chopped cilantro leaves
2 teaspoons freshly chopped parsley leaves
1 egg
1/2 teaspoon red pepper flakes
1/2 cup bread crumbs
I also one jalapeno pepper to my burgers. It spiced them up a little bit.
Salt and fresh ground black pepper
4 hamburger rolls- Sandra suggests using the leftovers for another recipe, which is why only 4 hamburger buns are called for. I got 8 burgers out of my recipe

Optional Toppings:
1 tomato, sliced
4 small Romaine lettuce leaves, or any other type you have on hand
1/4 cup ketchup


Directions

Heat a grill or grill pan over medium-low heat.

In a food processor, pulse onion and garlic until finely chopped. Add 1 can black beans, cilantro, parsley, egg, and red pepper flakes and pulse to combine.

Transfer mixture to a large mixing bowl, add the remaining can of black beans and the bread crumbs. Season with salt and pepper, to taste, and mix until well combined.

Reserve 1/3 of the black bean mixture for Round 2 Recipe. Divide remaining mixture into 4 portions and form into patties. Place on hot oiled grill over medium-low heat and cook about 6 minutes a side or until heated through. Toast hamburger buns on a grill. Place a burger on the bottom of each bun. Top with lettuce, tomato and ketchup. Cover the burgers with the top of the bun and serve.


Review
These were much better than I was anticipating, having never had a black bean burger before. I thought they were going to be mushy and without real consistency, but they were very tasty. Of course, they didn't taste exactly like a real beef hamburger, but I think I could get used to this as an acceptable substitute were I to ever become a vegetarian.

On the first night, we used the suggested toppings above, but on the second night, we tried salsa instead of ketchup and it was much much better.

Thursday, August 27, 2009

Black Bean Soup - Tyler Florence Style

Another Tyler recipe. This time, I wasn't even trying to make a recipe created by him, honest! As I mentioned in another post, we wanted to take it easy this week with eating, so we opted for meat-free meal plan. Black beans are a perennial favorite of mine, so I googled black bean soup and this recipe came up. This was surprisingly easy to make. The most difficult part was pureeing the garlic, onions and peppers because I only have a mini-prep. I had to do two rounds of processing before I was able to get through the whole peppper and onion!

Black Bean Soup
courtesy Tyler Florence of Food Network


Ingredients
1 pound dried black beans - I used 2 15 oz cans of pre-cooked black beans
4 cloves garlic - only two cloves of garlic for me!
2 onions, roughly chopped - I only used one because I thought more than that would be a little onion heavy for my tastes
1 green bell pepper, seeded and roughly chopped
1/4 bunch fresh cilantro - I substituted dried cilantro
Extra-virgin olive oil
2 sprigs fresh oregano - subbed dry again
2 tablespoons ground cumin
1 smoked ham hock (since we were staying away from meat - although this sounds delicious!)
1 jalapeno, split
1 3/4 quarts low-sodium chicken stock (To make this completely veg, substitute this for vegetable stock)
Kosher salt and freshly ground black pepper
Crema: I didn't make the crema, but I thought I would post it anyway in case someone wanted to attempt it
1 cup sour cream
2 teaspoons lime zest
Lime wedges, for garnish
Cilantro sprigs, for garnish

Directions
Pick through the beans and discard any debris - wash under cold running water.(skipped this step since I used canned beans) In a food processor, add garlic, onion, bell pepper, and cilantro.
Set a large pot over medium heat and add a 3-count of olive oil. Add the oregano and cumin. Add vegetable puree and saute until just fragrant, 7 to 10 minutes. Add beans, ham hock, jalapeno, and stock. Slightly cover and simmer for 2 hours until beans are tender. (Since my beans were already cooked and I didn't use the ham hock, I only simmered it for 20 minutes)

When cooked, take out ham hock. Cut ham meat off the bone, cut into pieces and set aside.

Using a blender or immersion blender, puree just enough of the beans and stock (about a third of the total pot) to thicken up the soup and bring everything together.(I don't own an immersion blender and since we're moving my real blender was packed away, so I just smashed some of the beans with the back of a large spoon. This thickened the soup, but not as much as blending them would have.) Season with salt and pepper and fold ham meat back into the soup.

Make the crema by combining sour cream and zest. Serve each soup with a spoonful of lime crema, a squeeze of lime and some fresh cilantro.


Pardon the ugly picture - It tastes much better than it looks!


Review
My husband was a little concerned the soup would taste too onion-y because that's all he could smell when I was cooking. However, the soup had the perfect balance of all the flavors. Instead of garnishing ours with the crema recipe above, we used part-skim mozzarella. The only thing I might do differently next time is add some chili powder or red pepper flakes to kick it up a notch. It wasn't quite as spicy as I like my black bean soups. Another A+ for Tyler!

Make sure you visit Tyler Florence Fridays for a round up of other awesome Tyler recipes!


Garden Orzo Salad with Herb Dressing

After our long vacation of eating out nightly, we decided that this week we'd eat a little lighter. I think while we were away we gained about 5 pounds from all the yummy food, so I'm sure our waistlines will thank us for taking it easy this week.

I saw this recipe on the food network show Rescue Chef on Sunday morning and decided it would be perfect. On the show, it was slotted as a side dish, but it more than filled us as a main course. You could probably even add some chicken to it if you want to make it a little more filling. I wanted something quick and relatively free of mess, so I stayed away from the chicken option.

Garden Orzo Salad with Herb Dressing
adapted from Food Network chef Danny Boome


Ingredients
NOTE - I halved the entire recipe because it said it served 20 on the website. The amount I ended up with will be more than enough for the two of us to eat for three nights.

For the herb dressing:
2 lemons, zested and juiced
2 oranges, zested and juiced 1 tbsp orange juice, no pulp
1 cup cider white wine vinegar
2 cups 1 tbsp fresh parsley dried cilantro leaves
2 cups 1 tbsp fresh basil dried basil leaves
2 cups extra-virgin olive oil
Salt and freshly ground black pepper
1 teaspoon red pepper flakes

For the salad:
4 cups orzo
Salt, for water
5 ears corn, kernels removed
5 stalks celery, diced
1 cucumber, seeded and diced
2 pints cherry tomatoes

Directions
In a food processor add lemon zest and juice, orange zest and juice, cider vinegar, parsley, basil. Turn on the processor and slowly add the olive oil until the mixture is blended together. Process until smooth and season with salt and pepper, to taste. Set aside.

Cook orzo in large pot of boiling salted water until tender but still firm to bite, about 10 minutes, stirring occasionally.

To a large mixing bowl add the raw corn kernels (I cooked my corn - on the cob - before I added it to the salad at the recc of some of those who commented on the original recipe posted on food network's website), diced celery, seeded and diced cucumber and whole cherry tomatoes.

Once orzo is cooked, drain and rinse under cold water; drain well. Add cooled orzo to bowl and toss. Add dressing to salad and toss again. Season with salt and pepper, if needed. Serve.


Review
I thought the salad was very good, but was a little worried about the dressing. Many people commented on the original recipe that it was too tart. When I tasted it after mixing it up, they were right. After it was added to the salad, however, some of the tartness went away, countered by the sweetness of the tomatoes and the corn. The amount of dressing the recipe makes is more than enough. I would add about 1/4 of what you made and taste it to be sure before adding more. You can always offer the rest on the side in case your guests want to add more. All in all, this was a super simple and refreshing salad. I will take this over your regular lettuce, tomato and cucumber any day!

Monday, July 27, 2009

Baked Potato with Black Beans and Corn

A couple weeks ago I joined Sparkpeople in an effort to track my eating and exercise. Like all things, I was really good at entering it all in every day...for the first two weeks or so. That's when it all went steadily downhill. Entering everything I ate was really good practice for me though. It helped me see that all those little "snacks" during the day really add up. Even though I'm not tracking my meals as religiously anymore, I think I've become more conscious of the mindless eating I do at work.

There are also some really excellent recipes for lunches that the site suggests. One such recipe is a variation on your regular baked potato.

Baked Potato with Black Beans and Corn
from Sparkpeople.com


Ingredients
1 baking potato
1/2 cup canned black beans, drained
1/4 cup canned sweet corn
1/2 cup salsa - I used medium because I didn't want it too spicy

Directions

Scrub potato with a wet paper towel to clean. Poke several holes in it with a fork. Wrap with a paper towel and cook in microwave for 4:30. Place on a plate and slice the potato in half. Top with beans and corn. Cook for another 30-45 seconds in microwave. Remove from microwave and top with salsa.

Servings: 1

This makes an excellent workday lunch because the whole thing can be put together in my office kitchen and it's really filling. I'm sure it would also be tasty on summer weekends when firing up the oven is the last thing you want to do.

This meal is also abs diet friendly because it incorporates black beans and corn.

Sunday, June 14, 2009

Tortellini and Summer Squash

Last weekend, we wanted something easy, light and tasty, so I flipped through my past recipes and found a recipe I made last year, Pasta Pan Fried with Butternut Squash. Since this is really a more "fall" recipe, I changed it up a bit, but used the same preparation technique. It was delicious.

Tortellini and Summer Squash
an adaptation of Pasta Pan Fried with Butternut Squash


Ingredients
3 squash, peeled and cubed (roughly 1 lb)
1 lb pre-made spinach tortellini, stuffed with cheese
Shredded Parmesean cheese
1/2 teaspoon each of:
oregano
rosemary
salt
pepper
marjoram

Directions


Boil water in large pot and add tortellini. Cook for 2 minutes, until floating. While the water is boiling, pan fry the squash in 1 tablespoon of oil. Stir in seasonings. When tortellini is cooked, drain and combine with squash. Let cook until tortellini is a little crispy on the edges. Top with cheese and serve.


Saturday, June 6, 2009

Black Bean Tacos

I made this recipe a couple months ago, but since I haven't been cooking much I thought I would post this. It was really quick and it doesn't require much prep work. I first saw it on Big City Cooking, but a few weeks later, smitten kitchen also posted it.

Crispy Black Bean Tacos
originally from Bon Appetit magazine, reworked by Big City Cooking and smitten kitchen


Ingredients

15 oz black beans, drained
1/2 tsp cumin
1/2 tsp garlic powder
1/4 tsp chili powder
5 tsp olive oil, divided
1 lime, juiced
2 c. coleslaw mix
2 green onions, green part only - I just used regular onions
1/3 c. cilantro, chopped
8 corn tortillas
1/2 c. feta reduced fat mexican blend cheese

Directions

Place beans, cumin, and garlic powder in bowl and partially mash (I used the back of a tablespoon, but I saw in the smitten kicthen post later that she used a potato masher. Either looks like it would accomplish the job). in a separate bowl combine coleslaw mix, green onions, cilantro, lime juice, and 2 tsp oil. Season with salt and pepper.


Heat 3 tsp oil in large skilled over medium high heat. Add tortillas and heat for 1 minute. Top half with the bean mixture and fold over. Heat 1 minute on each side until crispy. Remove from pan and stuff with feta and coleslaw mixture. Serve immediately. (if you want some heat top with hot sauce)

Saturday, May 2, 2009

Spicy Broccoli and Angelhair Pasta

Last night I was home alone. Normally, Fridays are our pizza night, but since I was by myself, I didn't see the point in ordering a whole pizza. We really didn't have many ingredients in the house, so I scanned through my recipe print outs to find something I could make with what we had. I ended up with this recipe for Broccoli and Angelhair pasta - only we didn't have angelhair, so I used linguine instead.

Spicy Broccoli and Angelhair Pasta
Adapted from Sara Moulton of Food Network


Ingredients

2 tablespoons olive oil
2 bunches broccoli cut into florets (about 7 cups)
1/2 teaspoon red pepper flakes
4 garlic cloves put through a press
2/3 pound angel hair pasta whole wheat linguine
3 cups chicken stock
1 cup freshly grated Parmesan cheese

Directions


In a large skillet heat the oil over high heat until it is smoking. Add the broccoli, give it a quick stir and cook it covered, stirring occasionally, for 3 minutes. (It should look crispy and brown around the edges.) Turn the heat to low and cook it for 2 minutes more or until it is just tender. Add the red pepper flakes, garlic and salt and pepper to taste and cook the mixture for 1 minute. While the broccoli mixture is cooking, boil the angel hair pasta in a large pot of salted water for 3 to 5 minutes or until it is just al dente and drain it. Add the cooked pasta, chicken stock and half of the parmesan cheese to the skillet and bring the mixture to a simmer. Divide among 4 bowls. Top each portion with the remaining cheese.


Servings: 4

Review
I like making this because it's so quick and easy to throw together, and it tastes great. I started making it at 6 and was finished eating and cleaned up by 7:15. If you want something with some more substance, you can always add chicken to this dish, too. To make this dish vegetarian, you can use vegetable stock instead of the chicken suggested above.

Sunday, March 1, 2009

Black Bean and Corn Salad

Now that I am eating unhealthy dinners every night at work, I'm trying to eat healthier throughout the day to make up for it. Last Sunday, we stopped at our local Whole Foods and picked up some of the ingredients I used for this lunch. It made enough for me to eat 4 days, so on Friday I had to take leftovers. It was really tasty, but could probably ise some tomatoes or green peppers to diversify the flavors. I also wanted to add some chick peas to it, but when we got home I realized we didn't have any in the pantry.

This recipe also features quinoa. I didn't know much about this grain before I purchased it, only that it's similar to couscous. If you'd like to know more, you can read up on this healthy grain here.

Black Bean and Corn Salad

Ingredients

1 can black beans, drained
1 can yellow corn, drained
1 cup alfalfa sprouts
1/4 cup quinoa
1 teaspoon dried cilantro
1/4 teaspoon cayenne pepper
1 teaspoon red pepper flakes
2 tablespoons red wine vinegar
2 tablespoons olive oil

Directions

Mix all above together. Seperate into 4 lunch sized portions. Enjoy!


Servings: 4