Showing posts with label baking. Show all posts

Monday, January 11, 2010

Sunday Brunch Menu

Last Sunday I hosted a brunch for 13 of our closest friends. I've always loved breakfast food, and hate that I can never serve it when we have a party because we always have them at night. So this Sunday, I got my chance to cook up a fabulous brunch for some even more fabulous people.

Now, before I get to the menu, I need to apologize for not having any pictures. Even though I prepared almost everything the night before, the morning was a little hectic and I didn't have time to snap any before it was all devoured. At least there were no leftovers - that's a good thing, right?

Sunday Brunch Menu

Food


Cherry Poppy Seed Muffins from Tyler Florence - These muffins were to die for. We actually had a few left over and I was so happy to be able to eat them for the next few days as a quick breakfast on the way to work.

Blueberry Muffins from Alton Brown - I thought these were a little greasy and they didn't really rise. I think the next time I want to make blueberry muffins I'll use the base recipe from the muffins above and substitute in blueberries.

Scrambled Eggs - always a favorite of mine. I'll sneak in a picture from a few months ago when I posted about a small scrambled egg breakfast.


Overnight French Toast - Better Homes and Gardens Cookbook, Bridal Edition - this was the closest recipe I could find online to match the one from the book.

Yogurt - no one really ate the yogurt but I had to include something healthy. If I had to do it again, I'd mix in some almonds and blueberries to make it look more appetizing.

Fresh Fruit

Bacon - I only made one pack of bacon, and it was barely enough. I was the last one to make up my plate and there was only one lonely piece left when I got to it.

Apple Harvest Oatmeal - this was really delicious too. I don't normally like Oatmeal, but with all the different spices in it, this tastes lovely. It wasn't that hard to make, either.

Beverages
Coffee
Tea
Orange Juice - with fresh sliced oranges - I only bought 1 gallon of juice and it went quickly. I think next year I am going to try making mimosas.

Friday, December 11, 2009

Warm Apple Cake

I made this cake on Thanksgiving and it was a real hit. Though the name of it is Warm Apple Cake, I served it room temperature. Keeping something warm while traveling and then eating a big turkey dinner is not an easy feat. I also hate reheating something that is supposed to be made warm. The taste just isn't the same. I once tried to reheat a pecan pie, and it ended up runny. It still tasted great, but the presentation just wasn't there.

So, while this cake wasn't served as intended, it was still delicious, and it really had staying power. We were eating it well into the next week. That's the thing about Thanksgiving meals. You're so full after the big meal, there's no room for all of those delicious desserts! I ended up eating only a small piece of this cake on Thanksgiving, as did the rest of my family. That left us with almost the whole cake leftover, which was fine with us! I will never turn down a delicious dessert that I can eat 3 or 4 more times after dinner every night.

Warm Apple Cake
taken from 101 Easy Entertaining Recipes, by Gooseberry Patch


Ingredients
1 c. all-purpose flour (I used half AP, half whole wheat)
1 c. sugar
1 t. baking soda
1 t. cinnamon
1/4 t. salt
1 egg, beaten
2 c. apples, cored, peeled and grated
1/2 c. chopped walnuts, divided

Directions
Preheat over to 350 degrees Farenheit. Combine first 5 ingredients in a large bowl. Mix together egg, apples, and 1/4 cup nuts; add to flour mixture. Spread in a greased 8"x8" baking pan. Bake for 25 to 30 minutes, until a toothpick tests clean. Top with remaining nuts and serve warm.

Servings: 9


Chef's Notes
The recipe in the book also recomended that the cake be topped with a caramel sauce. I didn't have the time or the means to make this on Thanksgiving morning, so I skipped it. It would probably taste great, though. Instead, we topped it with whipped cream and when I had it later in the week, I served it with a scoop of vanilla ice cream.

When I first started to make this cake, I had some reservations. The batter seemed really sticky and wasn't really settling into the pan. I thought maybe I used too much flour, but after some shaking of the pan, the batter ended up covering it.

I used 4 fuji apples for this recipe and it was just sweet enough. I don't have a grater, so instead of grating the apples up, I chopped them into small pieces in my food processor. Having some chunks of apple in the cake was really a nice touch. I'm glad I didn't have the grater.

Wednesday, October 21, 2009

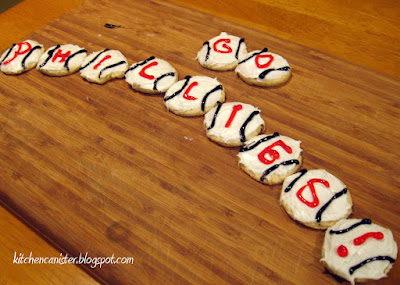
GO Phillies! - Sugar Cookies

Game 5 is underway and my Phillies have a chance to clinch a spot at the World Series tonight. The least I can do to wish them luck is.....bake? Yes, we don't have tickets (we didn't win the lottery the team ran), so we're watching from our living room and enjoying these sugar cookies from Alton Brown. (the icing was store bought because I have learned that I do not possess the skill to make a quality icing from scratch!)


Alton Brown's Sugar Cookies

Ingredients

3 cups all-purpose flour
3/4 teaspoon baking powder
1/4 teaspoon salt
1 cup unsalted butter, softened
1 cup sugar
1 egg, beaten
1 tablespoon milk
Powdered sugar, for rolling out dough


Directions

Sift together flour, baking powder, and salt. Set aside. Place butter and sugar in large bowl of electric stand mixer and beat until light in color. Add egg and milk and beat to combine. Put mixer on low speed, gradually add flour, and beat until mixture pulls away from the side of the bowl. Divide the dough in half, wrap in waxed paper, and refrigerate for 2 hours.

Preheat oven to 375 degrees F.

Sprinkle surface where you will roll out dough with powdered sugar. Remove 1 wrapped pack of dough from refrigerator at a time, sprinkle rolling pin with powdered sugar, and roll out dough to 1/4-inch thick. Move the dough around and check underneath frequently to make sure it is not sticking. If dough has warmed during rolling, place cold cookie sheet on top for 10 minutes to chill. Cut into desired shape, place at least 1-inch apart on greased baking sheet, parchment, or silicone baking mat, and bake for 7 to 9 minutes or until cookies are just beginning to turn brown around the edges, rotating cookie sheet halfway through baking time. Let sit on baking sheet for 2 minutes after removal from oven and then move to complete cooling on wire rack. Serve as is or ice as desired. Store in airtight container for up to 1 week.


Recipe Notes
Like alot of others, I found the dough very hard to work with. It kept sticking to my rolling pin even after using the powdered sugar on it. I had one un-iced and it tasted really good though, unlike some reviews stated. I cut the white flour with whole wheat and also used smart balance butter spread instead of real butter. The cookies had to go the whole 9 minutes to brown on the edges in my oven. I would definitely make them again!

GO PHILLIES!!!!

Friday, December 19, 2008

Black and White Chocolate Chip Cookies

Last weekend, we held our annual winter party. This year, the theme was "Ready to Rock" and everyone came in their favorite band's t-shirt. We set up our Rock Band instruments for xBox and the party was quite a success. To keep everyone satisfied, we ordered pizza and I cooked up a bunch of snacks. One of the dessert items were Black and White Chocolate Chip Cookies.

I found the recipe a couple weeks ago on The Hungry Mouse. If you click over to her post, you'll see the cookies I made are much darker than hers. I'm not sure where I went wrong, but the cookies still turned out great. I think I may have used too many oreos (which isn't necessarily a bad thing!).

Black and White Chocolate Chip Cookies
originally from The Hungry Mouse blog


Ingredients:


11 Tbls. butter (that’s 2/3 of a cup)
1/2 cup white sugar
1/2 cup brown sugar
1 egg
1 tsp. vanilla extract
1 1/4 cups flour
1/2 tsp. baking soda
1/2 tsp. kosher salt
1 1/4 cups chocolate chips
20 Oreos (or other creme-filled chocolate cookies)

Directions:
About a half an hour before baking, take out the butter and let it soften up.

Place the oreos in a gallon sized zip top bag and smash the cookies into small pieces with a rolling pin. When finished, there should be about 2 cups of crushed oreo. Set aside.


Preheat the oven to 350 degrees. Line two sheet pans with parchment paper and set aside.

Combine the white and brown sugar in the mixer bowl. Add the vanilla extract. Toss in the egg and softened butter. Using the paddle beater, beat on medium-high for a minute until ingredients come together.


Add the flour, baking soda and salt to the bowl and beat on medium-high until the dry ingredients are well combined with the wet, scraping the sides of the bowl when necessary.


Add the chocolate chips. Once the chips are mixed in, add the oreos. Beat on medium-high until well combined.


Drop spoon sized balls of dough onto the cookie sheets, spacing them out evenly. Bake for about 13 minutes at 350 degrees (NOTE: I only baked mine for 10 minutes and they came out perfect) Transfer the cookies to a rack to cool.


Servings: About 2 dozen


Review:
These cookies are really good. They are sort of crunchy. Just like a regular oreo, though go great with a glass of milk. Everyone at the party loved them.

***NOTE*** I will be submitting this to foodblogga's Christmas cookie roundup. Click the picture below for details on how to submit your favorite cookie recipe. The deadline is Sunday December 21st!

Cookies falling flat??

Since it's that time of year when baking goes into high gear, I thought I'd share the following article on baking. I have a lot of trouble when it comes to baking and it helped me understand the importance of one simple (or so it seems) ingredient: butter.

Butter Holds the Secret to Cookies That Sing

Thanks to the hubby for passing it on!